Showing posts with label hull. Show all posts

Thursday, September 5, 2013

Fiberglass: Not a Total Disaster

Labor Day Weekend was my big chance to fiberglass the hull, with plenty of time to lay the cloth and "fill the weave" with a couple more coats of epoxy in quick succession, avoiding the need to sand and ensuring a strong chemical bond between the coats. "The best-laid schemes o' mice an' men," as they say, "Gang aft agley." And oh, agley did they gang! No lasting damage was done... But I'm getting ahead of myself.

Here we see the bare hull. All the nicks and scratches have been filled and sanded smooth. All the edges and corners have been rounded. Not everything is completely "fair", but everything is smooth, so the fiberglass cloth can easily lay against it.

Here the first two panels of cloth are laid out. My original intent was to use a single length of cloth to cover each side, leaving only a small lens shape along the keel to cover with an additional sheet. Reading John Welsford's article, Fiberglassing Plywood, changed my mind. Five panels as shown will cover everything except small portions at the bow and stern.

Well, that's how it was supposed to go. I've discussed earlier the careful planning I did, the test piece I made up, how I made sure the cloth could adhere to the curves I'd prepared.

Did. Not. Work. At. All.

Apparently what works on a 3 square foot trial can not be assumed to work on the entirety of a 20' long, 6'8" beam boat. Or the planets were not aligned, or the gods not appeased, or something. I started at the top to work my way down from there. I moved to the bottom to work my way up. I tried in the middle. Pressing the cloth down on one side of the curve caused it to pop up on the other. Smoothing the cloth on the other side made it bulge on the one. Strong words didn't help. Not even the stomping of feet had any effect. Unbelievable.

In the end, I had to concede defeat. Before the epoxy kicked off, I pulled the glass cloth from the boat, and cooled my heels with an ice cold beverage - extra bitter. Only the one panel of epoxy cloth was ruined, a nice benefit of not doing the whole side at once, one I had not considered. The others can be used when I glass the decks or cabin top.

The weekend wasn't a total loss. I put two coats of epoxy on the whole hull, and it looks very nice. It's the first big change I've seen in a long time, so that's pretty satisfying. I'll need to sand out some unevenness, and maybe give one more coat of epoxy before it's ready to paint. First, though, I need to finish the keel and the stem and stern posts. Here is where things stand today:

As for the epoxy soaked fiberglass

Wednesday, August 28, 2013

Filling and Sanding

Well it's been some time since my last update. I have been working, but truthfully - it's not very interesting. Or photogenic. But that is set to change soon, so I thought I'd set the stage.

Rough surface left by wood flour mixture.
I began the summer putting fillets along each of the plank edges. I used a wood flour mix in the epoxy to make a make a structural adhesive, but thick enough (peanut butter consistency, or "non-sagging" as the System Three folks say) to hold its shape. I used one of my yellow squeegees to scoop some into the corner between the planks, and then used the corner to make a nice, even, concave fillet.

You can see the result to the left. The wood flour and epoxy mixture leaves a surface that is rather rough.  I went back over it with a fairing compound.  This I made by adding "phenolic micro-balloons to the epoxy.  These, I guess, are tiny hollow spheres.  The resulting mixture sands more easily than the epoxy alone.  It doesn't keep the epoxy from running, though, so I also added a little silica thickener, which does sort of the same job as wood flour, but leaves a smoother surface.

Smoother surface left by fairing compound.
After that, it's been a matter of sanding everything smooth.  Finding all the scratches and dings in the plywood.  Filling and sanding.  Looking more closely at the scarf joints.  Filling and sanding.  Looking for all the screw holes.  Filling and sanding. 

I made a long sanding block from a 24" sanding belt and some scrap wood.  I used sandpaper over the rounded edge of a foam block to get into the concave fillets, and a metal sanding block with a thick felt pad, which I inherited from my grandfather, to sand the rounded edges of the planking. 

I made a frustrating discovery in the course of all this.   The sheerstrakes make a bit of a hard turn at station 3.  You may recall I had some difficulty getting everything aligned when I first glued the scarfs on the sheerstrake.  I had to cut it apart and do it again.  I tried, for the first time, gluing the joint on the boat, hoping that would keep everything in place.  It did do that.

Tools of the trade.

I had been using the station moulds as a reference for marking the scarf joints, and so all the joints fall right on a mould.  Apperently, the thinner wood in the scarf bends more easily.  In any case, the resulting join makes a sharper bend at that point.  It's not terrible.  It's not too noticeable when you just look at it.  But you can definitely feel my long sanding block rock back and forth across it.  I think when it's painted it will be easy to spot.  Hopefully I can coax it back into a fair curve when I install the interior framing along the sheer. 
See, it's not too bad.  Maybe no one will notice...

I cleaned up the ends of the planking at the stem and stern with my power plane.  Boy was that satisfying.  For once I followed my own advice and went ever so slowly.  The power plane also helped me plane the garboards down along the keelson.  I measured out where the keel will widen from 2 1/2" to 4" for the lead ballast, and planed a wider flat spot there.  Once I get the hull glassed, it will be all ready to receive the keel - the next big step in this project.

Tuesday, June 11, 2013

Spring has Sprung

Well the worst of the cold weather passed with the end of March. April was a busy month, and a good bit of May was spent recovering from April. I did get to do some cleaning up. It's surprising what just a couple months of "I'll just put this here for now," will do. I have things looking much more organized now, but I couldn't get everything cleaned up before the urge to Do Something overcame me.

Experimenting with fiberglass cloth over the plank lands.

I'd been thinking a lot about how to finish the hull, and had decided to put a fiberglass skin over the plywood, but I wasn't quite sure how I wanted to do it. Other builders have put fiberglass and epoxy on each plank separately. This protects the faces of the plywood, but less protection to the more delicate edges. It allows the builder to keep the traditional "clinker" look where the planks overlap, but does not add any additional strength to that joint.

My main reason for using fiberglass is to protect the edges, so I've been thinking about using a continuous layer of fiberglass cloth to cover the planking. I'm also interested in the additional strength this will add. The epoxy glued overlaps are, in principle, plenty strong. In all my destructive tests, the plywood failed before the epoxy bond. But I know I have a few places where there is a gap between the planks that the epoxy didn't fill completely, though. The angle of my plank land must have been off a little bit. I've gone back to fill these in, but, as I'm planning to use the fiberglass anyway, a little extra piece of mind can't hurt.

I don't want to round over the edges of the planking more than I need to, so I made up a test piece from some scrap.

My System Three squeegee makes an appropriately sized fillet.

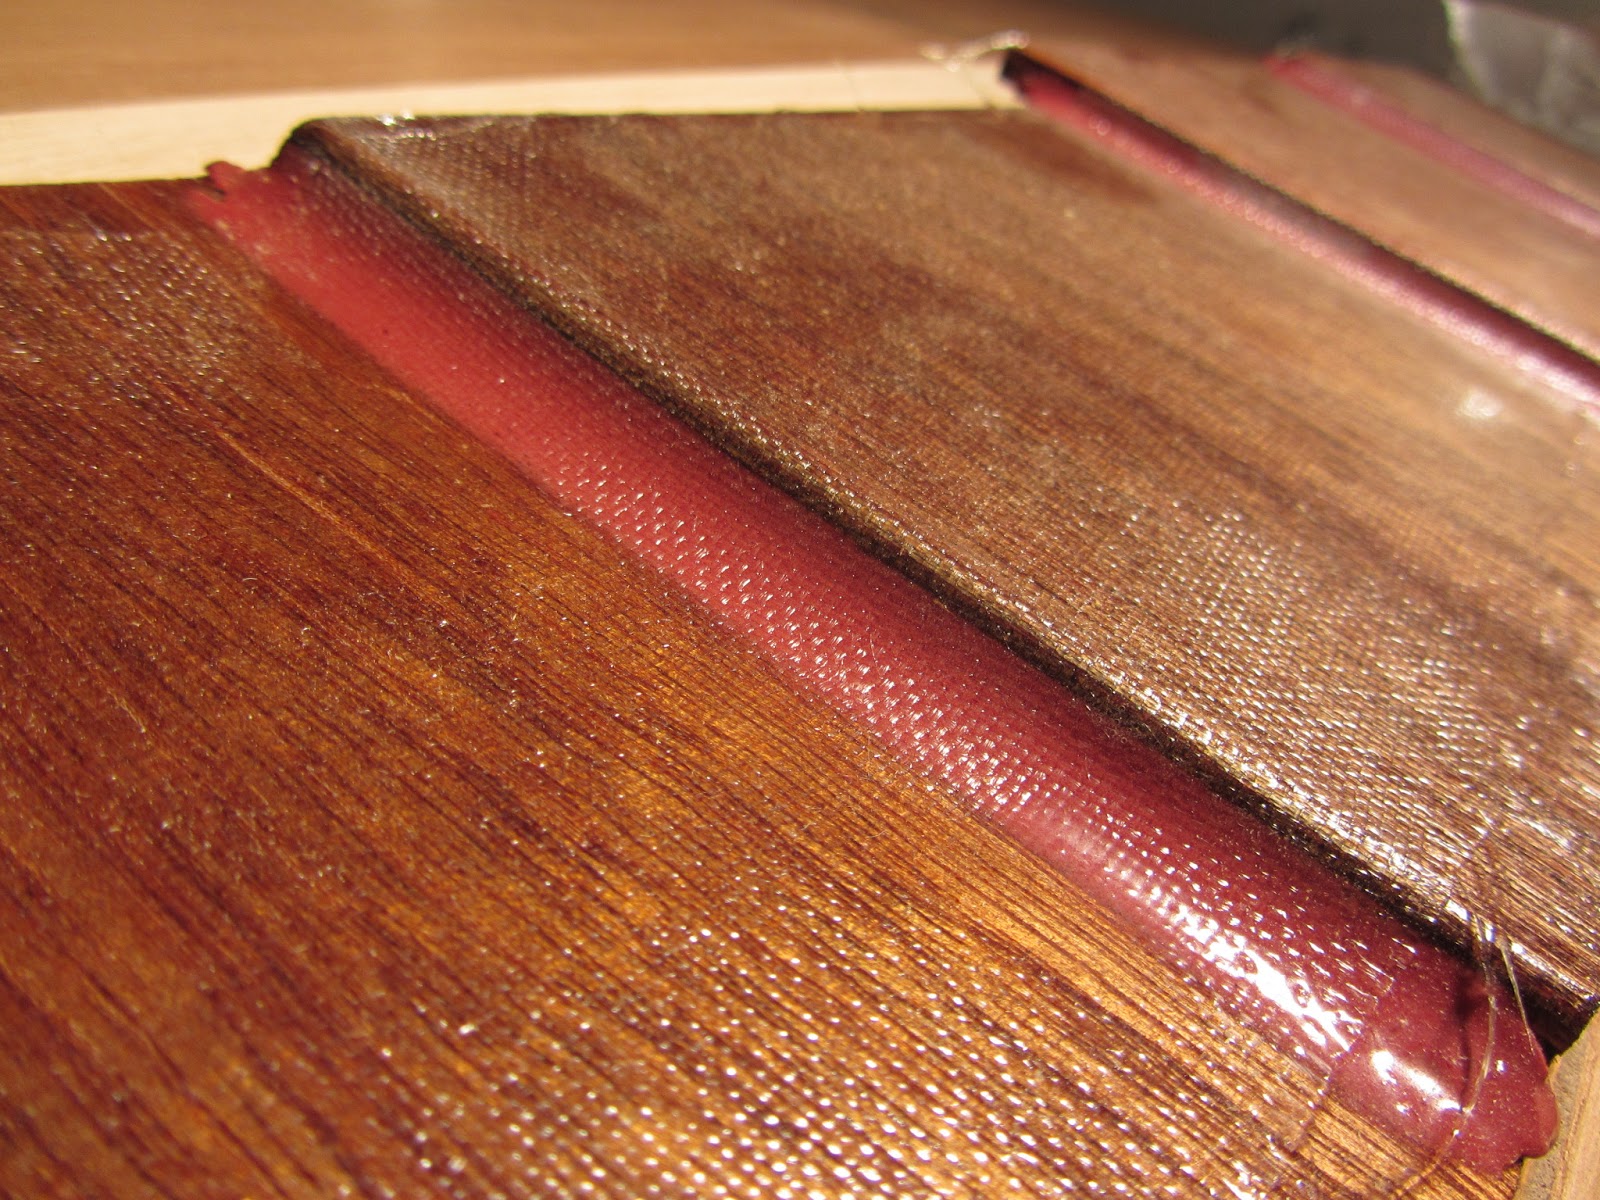
I rounded the corner with either a 1/8 inch radius or 3/16, and made a fillet with either my System Three squeegee or a tongue depressor. I'm using the lightest weight cloth I could find, 4oz., so it would conform more easily to the curves. The 3/16 radius with the squeegee worked all right.  It took a little massaging to get the cloth to adhere firmly, but in the end it did.


The cloth clings nicely to both the inside and outside curves.
The fillet left by the tongue depressor was just too tight. I couldn't get the cloth to adhere. In some places it stuck, but in others it pulled away. You can see the light colored patch in front of the stick. There is a bubble of air underneath the fiberglass cloth.
The radius left by the tongue depressor is too tight!

The cloth did actually adhere to the tighter 1/8 inch roundover, but not without a lot of careful work. The thought of trying to get a 20' long piece of cloth to cling for the full length is not appealing. Indeed, even with the more gentle 3/16 radius, it may be a chore to get everything right. This is compounded by the fact that I plan to use one continuous piece of cloth to cover each side of the boat - all six seams. (Well, except for a lens shaped section near the keel that I'll have to go back and cover after the sides are cured.) This will be two long days of epoxy work.

Sunday, February 24, 2013

Cold Weather Work

Well, the worst part of working in a 20 degree (-7C) shop has to be holding on to your 20 degree tools. Anything with a metal handle (I'm looking at you, rebate plane) is right out. Plastic handles are a little better, warming up after a few minutes of sucking the heat out of your fingers.

Pennsylvania winters are not so severe, but it's been cold enough to keep me from getting much done. I made a short sanding board from a 24" sanding belt and some scrap wood. With the kerosine heater going, and the effort from sanding, I stayed warm enough to get most of the boat pretty smooth. I've been working mostly on the scarfs. I cleaned them up pretty well before gluing them to the hull, but they still needed a bit of work. They're looking pretty good now, but some of them have some dips that need to be filled. I'll have to wait for some warm weather to make an epoxy fairing compound.

I did have a couple warm nights that allowed me to fill the screw holes along the keelson where I screwed the garboard plank in place while the epoxy set up. I used straight epoxy where it wouldn't run out, and thickened the epoxy with wood flour where I needed to.

Aside from fairing around the scarfs, I need to finish planing along the backbone so it will be ready to receive the outer stem post, stern post and the deadwood. That can be done in the cold. I can also start making patterns for the posts and the deadwood. That ought to be enough to keep me going. Spring is not too far away.

Wednesday, January 23, 2013

Preparing for the Keel

I've ordered 4oz fiberglass cloth, which I will use to sheath the hull. This is meant primarily for surface protection, especially for the edges of the plywood. I will most likely cover each plank separately, which means the cloth will not really add any strength to the hull, but that is not needed in any case. The cloth, and some additional epoxy, should be arriving soon, but as the temperature today is topping out at 13F (that's -10C) I don't know that I'll be doing much epoxy work any time soon. The System Three fast hardener will cure as low as 35F, but I ordered the medium hardener, as I probably will be doing most of this work when it is a bit warmer.

In the mean time, I'm starting to get the hull ready to accept the outer stem and stern posts and the keel. Where the planking meets the keelson I've left the overlaps rough. Before attaching the keel I'll have to smooth this out using the power plane. Over to the right you can see the view along the keelson. There are screw holes along the edge of the planking, those will have to be filled in with epoxy - which will also have to wait until the temperature warms up a bit.

Here you can see the view down from above the stern. Here also, the plank ends are uneven, and will need to be planed down to make a smooth surface for the outer stern post. The view at the stem is similar.

Keeping in mind what I've learned about using the power plane, I'm trying to take things nice and easy. I'm trying to go slowly, removing about 1/32 inch at each pass, and checking frequently with a level to make sure the surface is even. At first, I'm just taking off enough to make a level reference surface for the bed of the plane. After that, I'll go back and plane down until the width of the flat surface is equal to that of the keel. This will require a bit of thinking. As designed, the keel is 2.5" thick, with a bulge in the center section to accommodate a 4" wide lead ballast keel. I'll want to figure out just how I'll do this before I try to go too far. I'll need to see what kind of timber I can get for the keel before I can be sure how I'll get that done.

Where the centerline of the boat curves toward the stem and stern, the level becomes useless, and I use the face of the inner stem and stern posts as a guide. I've planed things down so the edges of the planks protrude just a millimeter or so in front of the inner posts. I don't want to plane past this reference surface until I must. Ideally, I wouldn't remove any of the stem and stern posts, just plane the planking down to it.

There is one area that is going to cause some problems. For some reason, which is lost to me now, I didn't recess the plank lands on the garboard at the stern. At the time, I filled in the gap with epoxy mixed with some sort of plastic filler, but making a fair surface for the keel to land on may be a bit of a challenge. Well, that's what makes life interesting, isn't it?

Until things warm up a bit, I'll have to look for ways to keep the project moving forward. I can make patterns for the outer stem and stern posts, lay out the pieces and glue them in the basement. I haven't decided whether these will be laminated, or sawn from glued up pieces, but I'm leaning toward the latter. That's what I did for the inner posts. I can also work on sanding the hull, in preparation for fairing and fiberglass. Most likely, it won't be too long before the temperature comes back up. In the meantime, well, it's ski season! Generally, the colder and snowier it gets, the happier I am.

Sunday, January 13, 2013

Cleaning Up the Seams, Continued

Well, several weeks have gone by, with more holidays and more guests. The rebate plane turned out to be a good idea, and made pretty quick work of what I had feared would be a long and painful task. The clearly articulated three step process for cleaning all the squeeze out from the seams was not, in the end, the best approach for most of the boat. As I worked along, I developed a slightly different approach: just do whatever seems to work best.

The epoxy that squeezed out had different consistencies, depending, I guess, on how much wood flour I mixed in, and how much it had cured before I got the plank into position. I ended up going back and forth between working toward the plank edge and working toward the face of the next plank. In places where the epoxy formed a convex "bead," everything went pretty smoothly which ever way I approached it. If the epoxy had settled into a "fillet," though, the plane would want to ride up out of the corner. Sometimes I would change directions back and forth, sometimes I would plane down to the wood in one direction, then turn and plane away the rest of the epoxy from the other. In the end, it went pretty quickly, and pretty successfully.

I did notice two things as I worked along. This was the first time I had really, carefully, looked over the whole hull since beginning this project so long ago. First, my level of craftsmanship has increased dramatically. The more recent planks have much cleaner edges than the earlier ones, which have some wavy lines. I was able to smooth some of the earlier ones while cleaning up the epoxy. Mostly, though, I figured these will be below the waterline and no one will ever see them anyway. I'll get to clean them up a little more when I round over the edges in preparation for putting a fiberglass skin on the hull.

Second, there are a few places where the seam is a little glue starved. I'll need to go back and use a syringe to fill some gaps. I still need to fill a ton of screw holes along the keelson. This will just add a little to that part of the project. The only area I'm concerned about is between the fifth and sixth plank near the starboard bow. There is a 2 to 3 foot stretch where I can see light between the planks. I need to figure out how to get a good bond between those planks. I'm thinking of taping the bottom of the seam and letting some unthickened run into it. Maybe use screws to pull the planks together while it cures. The gap is small - less than a millimeter, but with unthickened epoxy, I guess it's probably better to minimize the gap.

Friday, December 14, 2012

Cleaning Up the Seams

Things have been a little slow in the boatshop these past couple weeks. After working hard to get the planking finished, I had to devote some energy to catching up in other areas of my life. Visits from out-of-town guests and Thanksgiving holiday activities filled my schedule. I also have a day job that requires me to do, you know... work.

...And... we signed on a new crew member. He made his mark on November 26, with a rating of "Ship's Baby." This has, among other things, thrown off our normal schedule of watch keeping.

I've been getting back to work in the shop, though, and cleaning up the glue seams at the plank lands. I was not diligent about taking care of this as I went along, and so now I have a job before me. I cleaned up one seam with a chisel, spreading the work over a couple nights. It went well enough, but was tiring for my fingers and wrists.

Tonight, I had the thought of using my rebate plane. I took off all the guides and cutters, so the plane blade can cut cleanly into a right angle corner. I finished a second seam without difficulty. Some areas need more attention than others, and I'm still trying to get the hang of it, but my basic approach is this: (1) clean up the bottom edge of the upper plank, which is facing up, since the boat is upside down, (2) use the edge of the plank as a guide for the plane while working away at the squeeze-out, (3) gradually change the angle of the plane until the blade is parallel with the lower plank. Moving along in this way, the job goes pretty quickly.

I'll try to get some photos after I work on this technique a bit more. I've done two of twelve seams. I should be an expert just about the time I finish.