Monday, November 18, 2013

Working on the Keel. Decisions, Decisions.

With the stem epoxied in place, I began to work on the keel. I wasn't quite sure how to go about this, and as I was feeling my way through, I didn't take pictures for the most part. I began by crawling under the hull and marking the locations of the floors. (In a house, these would be called "joists", and the floor would be laid on the joists. In a boat, the "sole" is laid on the "floors." Just one of those nautical things.) Their locations are found relative to the "stations" which are the locations of the molds which give the hull it's shape as the planks are hung.

This may seem like a bit of procrastination, but in fact it was not. The keel bolts go through the keel and keelson, and are bolted through the floors. After marking their locations, I drilled a pilot hole vertically through the keelson with a long 1/8" bit. The keel bolts will be 1/2" and 3/8", but I wanted to drill through to find their location on the outside of the hull. That also showed me the location of each station. They are each separated by 29" horizontally, but the curvature of the hull makes it difficult to measure with any reliability on the outside of the hull.

Next, at each station, I cut the end of a 2x4 so that it would stand vertically when set on the hull. I measured the depth of the keel from the planking at each station, and cut the 2x4's to these lengths. Setting them on the hull shows where the bottom of the keel ought to be. The keel runs in a straight from the 3rd station to the 8th, I was a little bit surprised that they seemed to line up exactly as they ought to.

As I said, I didn't take many photos as I was working along, but this shot from later in the process shows the 2x4's at the 7th and 8th station.

I had a nice straight clear piece of sassafras, about 5 inches wide, that I was able to clamp to the 2x4's. With the edge of the board aligned with the tops of the 2x4's, this put the board in just the right position. For most of the length of the keel, it doesn't protrude much more than this from the bottom of the planking. I was able to fill the gap between the hull and the bottom of this board with a two offcuts from the stem, scribed to fit into place. You can see them in this picture, taken after they were epoxied in place.

At this point, I was a little unsure how best to proceed. The keel is to be three layers of (roughly) 3/4" stock. Is it best to fit one layer, and then add to that, or work "from the front to the back." I'm still not entirely sure, maybe I'll have it figured out by the time I finish with it. In any case, I kind of did both. I was able to scribe three more boards to fill in the deadwood near the stern.

At the same time, I began work on the second layer. Probably. I say that because I have some doubts about how I will do that. Some builders of this design have let the grain in the center layer run vertically, perpendicular to the grain of the outer layers. There are a couple advantages to this, but normally this kind of cross-grain construction is not desirable. Wood expands and contracts as it's moisture content varies. As it gains moisture, it doesn't expand uniformly, though. It expands more across the grain than along the grain. Plywood is made of thin sheets of wood, glued with the grain alternating in direction. This makes plywood "dimensionally stable." It's dimensions don't change much with changes in humidity. Construction the keel in this way would make it very stable, and also less likely to warp. Certain aspects of the construction are also simplified with this approach.

On the other hand, what will happen when the keel absorbs water, as it inevitably will, or dries out over the winter? The builders who have used this method have not had any complaints, but... Well, I don't know.

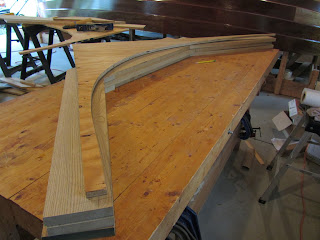
To the right, you can see the start of work on the center, vertical, layer. It's quite easy to cut these pieces to the correct shape. There are a lot of them, though, so it doesn't seem to be a time saver, though that was not the purpose. In any case, I'm a little undecided about whether to continue in this way or not. I think now that it may be just as easy to do three layers, all running fore and aft. I'll try to make some progress in other areas while I mull this over...

Here's another view of the situation.

Wednesday, November 6, 2013

Project Paralysis

Although this is my second boat building project, I still have difficulty overcoming doubt and uncertainty. How careful do my measurements need to be? How closely do I need to follow the lines? Am I doing this right? Am I building in mistakes today that will only be discovered when I launch her?

On the one hand, I'm pretty sure that I'm doing a reasonable job. On the other, though, I always worry that I'm about to make The Big Mistake That Ruins Everything. I feel this especially acutely when I'm making major and more or less irreversible changes. Hanging planks has always required overcoming some emotional hurdles, but after doing it twelve times, I wasn't slowed down too much by the thirteenth and fourteenth.

Now I'm faced with permanently affixing the outer stem to the hull with epoxy. As I contemplate this, I realize... that I have tools spread all over my shop. I really need to straighten up. And wood shavings that I haven't swept up. The most important thing right now is for me to check over the plans and make sure I know what size all the deck beams are supposed to be.

Honestly, I wouldn't get anywhere if I didn't trick myself into it. Here's how it goes:

After I hung the last plank, I knew the stem was the next step, and so I bought enough lumber and set it all out. I had the template for the stem, and I set the lumber out to try to find an optimal way to lay everything out. "I'm just laying boards on the workbench. I'm not really doing anything. I can stack them all up again when I'm done."

When I get things about as good as I think I can, "I'll just mark these positions. I can think about it later, but if I decide to go with this, then I'll be all set.

The next night I come back, and pick up where I left off. Since I've got the lumber all marked for cutting, I might as well go ahead and see how they really fit together. Once they are cut, I might as well glue them up. Then at that point, whatever my misgivings about how things have worked out so far, there's no reason not to keep working - cutting out the profile and shaping the leading edge. Even if there are problems with it, I might as well use it as practice, right? Then, at last, when I have everything done: "What? Am I going to start all over with the stem? Get more lumber? Waste all that work? No, time to epoxy this to the boat and move on."

"Just let me organize all my screwdrivers first."

Wednesday, October 23, 2013

The Stem, Part II

Having shaped the profile of the stem on the bandsaw, the sides now have to be shaped. The stem tapers from 2 1/4 inches at the hull to 1 1/2 inches at the leading edge. At the sheer, though, the stem must be left square, to receive a fitting for the bowsprit. This requires a transition, like the one shown on the cover of Chapelle's Boatbuilding. I've thought about how to do this for a long time, and I've really been looking forward to it.

First I marked out the width at the front of the stem, and measured back from the front face to about 1/8" from the back. The curve on the front was much more uniform than the back, which was shaped to fit the inner stem - as best I could. The concave face is much harder to shape, especially when it needs to match another surface. In the end, I got all the gaps to within a millimeter or so.

Next I marked the profile for the transition on the front face. It is a section of a circle with a radius of approximately 2 1/2 inches. I used a template for the arc, which I traced onto each side. (By "template" I mean the bottom of a can of Raid hornet spray.) After that, it was high school geometry. Using a compass and straight edge, I divided the distance from the edge to the bottom of the arc on the front face into halves and then quarters. I noted where these intersected the arc. Then I used my Veritas saddle square to project their locations onto the side of the stem. Next, I divided the distance between the front and back faces in halves and quarters. I marked the intersections of these lines with the projections from the front face.

In principle, these marks should lie on an arc of an ellipse. They did not, so I marked a nice looking curve the passed near those points. After all, it's a boat, not a homework assignment.

Then I sawed down close to the marks to define the area to be chiseled out. I've already started a little bit in this photo. Then, worked my way down to the lines. I worked down most of the stem with my power plane, but it couldn't get in close to this little detail. So I used a hammer and chisel to remove the bulk of the waste. Then I used the chisel by hand to clean things up. Finishing up with a rasp, the smallest plane I have, and then sandpaper. I think it turned out pretty well.

Friday, October 11, 2013

The Stem

With the hull finished, at least for now, I turn my attention to the backbone structure: The outer stem post, the keel, and the outer stern post. The best way to proceed seems to be to begin at the front and work my way backward. I use some long skinny scraps, which I've been holding onto for a long time to mark the profile of the stem. The arrow heads are tacked to a strip of 1-by material with hot glue.

Then I transfer the marks to a sheet of plywood. The astute observer will notice that the plywood is more scrap leftover from the building moulds.

After tracing the tips of the arrows, and springing a batten through the marks, The stem template is cut out and tried in place. A little light shows through. After numerous rounds of sanding down high spots, the fit has improved - a bit, anyway. Still there are spots where light shows through, but nowhere is it more than a millimeter off. Good enough for now. I'll still have to shape the stem itself.

I'd been feeling a bit jealous of builders like Richard in Canberra, Alec in Bermagui, and Ron in Sydney who have exotic tropical hardwoods, like jarrah, growing in their neighborhood. I'd not heard of this wood before, but I sounds like the perfect wood for keel construction, especially in epoxy based construction, where white oak would be questionable. It occurred to me, though, that jarrah isn't exotic to these builders, and they might view certain North American hardwoods as exotic. Like sassafras.

When I first started building, one of the early decisions I had to make was what wood to use for the keelson and inner stem and stern post. More generally, I was in a quandary about what to use for the interior framing - deck beams, carlins, frames, and such. Ash is traditional, but not rot resistant. Iroko? A bit pricy. I even called Iain Oughtred himself, who was very friendly and answered all my questions. On the subject of what wood to use, though, he basically said, "whatever you can get." Then I was reading my copy of Steward, who has this to say about sassafras:

Weight about 2.4 pounds [per board foot] (light). Moderately hard, moderately weak in bending. Highly resistant to decay... Freshly cut boards are said to have a sassafras odor, if you know what that is like!

I do know what it's like. I've seen it described as "spicy" or "like root beer," but that doesn't quite get it. It's wonderful. And it fills the shop every time you cut or sand the wood. WoodenBoat, meanwhile, has this to say:

Highly durable; has properties like ash but not so tough; once popular in light skiff construction.

Well, that did it for me. It's not a major commercial wood by any stretch of the imagination, but if you ask at lumberyards and look around, you can find it here and there. A phone call and a drive to a sawmill about an hour away, and I had the sassafras lumber for the inner stem and stern and the keelson. Now, after years of planking with meranti plywood, it's back to sassafras. At the left, you can see the stock that will become the outer stem.

Here's the general setup.

I'll use the plywood template to trace the curve of the stem onto the assembly after it is all glued together.

And this is the big glue-up.

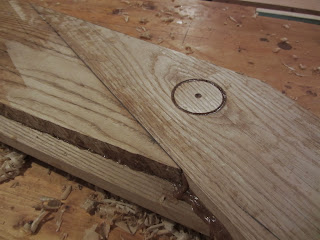
One thing about sassafras is that the trees do not grow especially large and it's difficult to find nice clear boards. There were a couple knots that I couldn't work around - well, didn't work around. Before gluing everything together, I cut them out with a hole saw, and used the same saw to cut a plug from a clear section of another board.

When I noticed the knot on the back of the board (it didn't go all the way through, so I didn't notice when I laid out the cuts) I ought to have started over. I guess I was in "git 'er done" mode that night. I also could have tried to match the grain in the plug. Too late now. It's enshrined forever as a reminder to be more careful in the future. It may be below the waterline. If it's too glaringly obvious, I can always paint it, but probably not.

Gluing the nine boards together was a slippery. sticky mess. I typically work pretty pretty cleanly and carefully, but the bottom layer slid a little bit, leaving some gaps. I made the inner stem and stern this same way and, honestly, I can't remember a single thing about it. I remember gluing a copy of the full-size pattern on to cut out at the band saw, but nothing about the guue-up. I didn't have any trouble with misalignment of the boards, though. At least I don't think I did, they've been covered by the planking for a long time now. Did I drill holes through near the edges to stick a nail through while everything was clamped up? That would have been a really good idea. This is why you shouldn't take nine years off in the middle of your project. In case you wondered why more people don't to that. I filled these gaps with unthickened epoxy, which seeped right down in.

The next task is to trace the template onto the assembly...

...and then take it to the band saw. Not an easy cut to make all by myself, but by hook or by crook, I got the job done. More on that later.

Sunday, September 29, 2013

Tall Ships Erie

Tall Ships Erie 2013 took place on September 5-9. Celebrating Commodore Perry's victory in the Battle of Lake Erie on September 10, 1813 during the War of 1812, eight tall ships joined U.S. Brig Niagara at the port of Erie. Tens of thousands of visitors came to view the ships and get a taste of what life at sea is like. Here are some of the hilights:

St. Lawrence II- Kingston, ON:

Lynx, Portsmouth NH:

All in all, it was a good event. There were many, many people there. All the parking areas seemed to be full to capacity. (We ended up parking on the street.) The lines to get on each of the ships were long. I think the experience would have been enhanced by have a few crew members on the ships with a two minute talk about... something. Explaining how the ship operates ("These are the halyards, they raise and lower the sails...") or the maintenance that needs to be done. On one ship, one of the crew was repairing a block. She could have told everyone who walked past her what she was doing and why.

Then again, I guess they don't have to do that to draw in the crowds.

Thursday, September 5, 2013

Fiberglass: Not a Total Disaster

Labor Day Weekend was my big chance to fiberglass the hull, with plenty of time to lay the cloth and "fill the weave" with a couple more coats of epoxy in quick succession, avoiding the need to sand and ensuring a strong chemical bond between the coats. "The best-laid schemes o' mice an' men," as they say, "Gang aft agley." And oh, agley did they gang! No lasting damage was done... But I'm getting ahead of myself.

Here we see the bare hull. All the nicks and scratches have been filled and sanded smooth. All the edges and corners have been rounded. Not everything is completely "fair", but everything is smooth, so the fiberglass cloth can easily lay against it.

Here the first two panels of cloth are laid out. My original intent was to use a single length of cloth to cover each side, leaving only a small lens shape along the keel to cover with an additional sheet. Reading John Welsford's article, Fiberglassing Plywood, changed my mind. Five panels as shown will cover everything except small portions at the bow and stern.

Well, that's how it was supposed to go. I've discussed earlier the careful planning I did, the test piece I made up, how I made sure the cloth could adhere to the curves I'd prepared.

Did. Not. Work. At. All.

Apparently what works on a 3 square foot trial can not be assumed to work on the entirety of a 20' long, 6'8" beam boat. Or the planets were not aligned, or the gods not appeased, or something. I started at the top to work my way down from there. I moved to the bottom to work my way up. I tried in the middle. Pressing the cloth down on one side of the curve caused it to pop up on the other. Smoothing the cloth on the other side made it bulge on the one. Strong words didn't help. Not even the stomping of feet had any effect. Unbelievable.

In the end, I had to concede defeat. Before the epoxy kicked off, I pulled the glass cloth from the boat, and cooled my heels with an ice cold beverage - extra bitter. Only the one panel of epoxy cloth was ruined, a nice benefit of not doing the whole side at once, one I had not considered. The others can be used when I glass the decks or cabin top.

The weekend wasn't a total loss. I put two coats of epoxy on the whole hull, and it looks very nice. It's the first big change I've seen in a long time, so that's pretty satisfying. I'll need to sand out some unevenness, and maybe give one more coat of epoxy before it's ready to paint. First, though, I need to finish the keel and the stem and stern posts. Here is where things stand today:

As for the epoxy soaked fiberglass

Wednesday, August 28, 2013

Filling and Sanding

Well it's been some time since my last update. I have been working, but truthfully - it's not very interesting. Or photogenic. But that is set to change soon, so I thought I'd set the stage.

Rough surface left by wood flour mixture.
I began the summer putting fillets along each of the plank edges. I used a wood flour mix in the epoxy to make a make a structural adhesive, but thick enough (peanut butter consistency, or "non-sagging" as the System Three folks say) to hold its shape. I used one of my yellow squeegees to scoop some into the corner between the planks, and then used the corner to make a nice, even, concave fillet.

You can see the result to the left. The wood flour and epoxy mixture leaves a surface that is rather rough.  I went back over it with a fairing compound.  This I made by adding "phenolic micro-balloons to the epoxy.  These, I guess, are tiny hollow spheres.  The resulting mixture sands more easily than the epoxy alone.  It doesn't keep the epoxy from running, though, so I also added a little silica thickener, which does sort of the same job as wood flour, but leaves a smoother surface.

Smoother surface left by fairing compound.
After that, it's been a matter of sanding everything smooth.  Finding all the scratches and dings in the plywood.  Filling and sanding.  Looking more closely at the scarf joints.  Filling and sanding.  Looking for all the screw holes.  Filling and sanding. 

I made a long sanding block from a 24" sanding belt and some scrap wood.  I used sandpaper over the rounded edge of a foam block to get into the concave fillets, and a metal sanding block with a thick felt pad, which I inherited from my grandfather, to sand the rounded edges of the planking. 

I made a frustrating discovery in the course of all this.   The sheerstrakes make a bit of a hard turn at station 3.  You may recall I had some difficulty getting everything aligned when I first glued the scarfs on the sheerstrake.  I had to cut it apart and do it again.  I tried, for the first time, gluing the joint on the boat, hoping that would keep everything in place.  It did do that.

Tools of the trade.

I had been using the station moulds as a reference for marking the scarf joints, and so all the joints fall right on a mould.  Apperently, the thinner wood in the scarf bends more easily.  In any case, the resulting join makes a sharper bend at that point.  It's not terrible.  It's not too noticeable when you just look at it.  But you can definitely feel my long sanding block rock back and forth across it.  I think when it's painted it will be easy to spot.  Hopefully I can coax it back into a fair curve when I install the interior framing along the sheer. 
See, it's not too bad.  Maybe no one will notice...

I cleaned up the ends of the planking at the stem and stern with my power plane.  Boy was that satisfying.  For once I followed my own advice and went ever so slowly.  The power plane also helped me plane the garboards down along the keelson.  I measured out where the keel will widen from 2 1/2" to 4" for the lead ballast, and planed a wider flat spot there.  Once I get the hull glassed, it will be all ready to receive the keel - the next big step in this project.

Tuesday, June 11, 2013

Spring has Sprung

Well the worst of the cold weather passed with the end of March. April was a busy month, and a good bit of May was spent recovering from April. I did get to do some cleaning up. It's surprising what just a couple months of "I'll just put this here for now," will do. I have things looking much more organized now, but I couldn't get everything cleaned up before the urge to Do Something overcame me.

Experimenting with fiberglass cloth over the plank lands.

I'd been thinking a lot about how to finish the hull, and had decided to put a fiberglass skin over the plywood, but I wasn't quite sure how I wanted to do it. Other builders have put fiberglass and epoxy on each plank separately. This protects the faces of the plywood, but less protection to the more delicate edges. It allows the builder to keep the traditional "clinker" look where the planks overlap, but does not add any additional strength to that joint.

My main reason for using fiberglass is to protect the edges, so I've been thinking about using a continuous layer of fiberglass cloth to cover the planking. I'm also interested in the additional strength this will add. The epoxy glued overlaps are, in principle, plenty strong. In all my destructive tests, the plywood failed before the epoxy bond. But I know I have a few places where there is a gap between the planks that the epoxy didn't fill completely, though. The angle of my plank land must have been off a little bit. I've gone back to fill these in, but, as I'm planning to use the fiberglass anyway, a little extra piece of mind can't hurt.

I don't want to round over the edges of the planking more than I need to, so I made up a test piece from some scrap.

My System Three squeegee makes an appropriately sized fillet.

I rounded the corner with either a 1/8 inch radius or 3/16, and made a fillet with either my System Three squeegee or a tongue depressor. I'm using the lightest weight cloth I could find, 4oz., so it would conform more easily to the curves. The 3/16 radius with the squeegee worked all right.  It took a little massaging to get the cloth to adhere firmly, but in the end it did.


The cloth clings nicely to both the inside and outside curves.
The fillet left by the tongue depressor was just too tight. I couldn't get the cloth to adhere. In some places it stuck, but in others it pulled away. You can see the light colored patch in front of the stick. There is a bubble of air underneath the fiberglass cloth.
The radius left by the tongue depressor is too tight!

The cloth did actually adhere to the tighter 1/8 inch roundover, but not without a lot of careful work. The thought of trying to get a 20' long piece of cloth to cling for the full length is not appealing. Indeed, even with the more gentle 3/16 radius, it may be a chore to get everything right. This is compounded by the fact that I plan to use one continuous piece of cloth to cover each side of the boat - all six seams. (Well, except for a lens shaped section near the keel that I'll have to go back and cover after the sides are cured.) This will be two long days of epoxy work.

Sunday, February 24, 2013

Cold Weather Work

Well, the worst part of working in a 20 degree (-7C) shop has to be holding on to your 20 degree tools. Anything with a metal handle (I'm looking at you, rebate plane) is right out. Plastic handles are a little better, warming up after a few minutes of sucking the heat out of your fingers.

Pennsylvania winters are not so severe, but it's been cold enough to keep me from getting much done. I made a short sanding board from a 24" sanding belt and some scrap wood. With the kerosine heater going, and the effort from sanding, I stayed warm enough to get most of the boat pretty smooth. I've been working mostly on the scarfs. I cleaned them up pretty well before gluing them to the hull, but they still needed a bit of work. They're looking pretty good now, but some of them have some dips that need to be filled. I'll have to wait for some warm weather to make an epoxy fairing compound.

I did have a couple warm nights that allowed me to fill the screw holes along the keelson where I screwed the garboard plank in place while the epoxy set up. I used straight epoxy where it wouldn't run out, and thickened the epoxy with wood flour where I needed to.

Aside from fairing around the scarfs, I need to finish planing along the backbone so it will be ready to receive the outer stem post, stern post and the deadwood. That can be done in the cold. I can also start making patterns for the posts and the deadwood. That ought to be enough to keep me going. Spring is not too far away.

Tuesday, February 5, 2013

Why Build a Wooden Boat

When I was a teenager, my parents owned a Catalina 25. We sailed it on a decent sized lake in upstate New York. We also had a Phantom, very similar to a Sunfish, which I sailed on the same lake. I had a great time sailing with my family, taking the Phantom out on my own and, when I was a little older, going out with friends on the Catalina.

We docked the Catalina in a narrow inlet. Coming back to the dock we had to motor past a number of other boats until we reached our slip. One day, I remember quite vividly, there was a boat at the end of the dock that caught my eye. I went back down to look at it after tying our boat up. This boat was somewhat smaller than most of the others; I'd guess 18', or maybe as small as 16'. It had a small cabin and was clearly made of wood. It was all painted, no brightwork, and I suppose it could have been said to have a workboat quality finish. Even so, there was something about it that fascinated me. It had been crafted, not produced. I remember thinking "they don't make them like that anymore."

I don't know whose boat that was, and I don't remember ever seeing it again. As time went by I mostly forgot about it. Until years later.

I did my graduate studies in Houston. Living on a graduate student's salary, one of my favorite pastimes was to browse the shelves of the many mega-bookstores. On one particular day, while looking at books in the sports section, probably for martial arts books, I noticed Buehler's Backyard Boatbuilding. Build your own boat? Such a thing had never occurred to me. Not long after, I discovered WoodenBoat Magazine. Based on the evidence from their "Launchings" section, all kinds of people built all sorts of boats.

That is when I remembered that little wooden boat at the end of the dock. I'm fully convinced that was someone's project. I wonder how many years that boat laid out, partially complete, in some fellow's garage. I wonder how many nights he went out there "just to get a little work done before bed." I wonder how many afternoons he sat, looking at his plans, thinking "now how am I going to do that."

When I go out to work on my boat, I like to imagine her floating at the end of a dock somewhere. I'd like to hope that someone's eye might be drawn to her. And as that someone looks her over, she will say to him "They don't build them like that. You have to do it yourself."

Wednesday, January 23, 2013

Preparing for the Keel

I've ordered 4oz fiberglass cloth, which I will use to sheath the hull. This is meant primarily for surface protection, especially for the edges of the plywood. I will most likely cover each plank separately, which means the cloth will not really add any strength to the hull, but that is not needed in any case. The cloth, and some additional epoxy, should be arriving soon, but as the temperature today is topping out at 13F (that's -10C) I don't know that I'll be doing much epoxy work any time soon. The System Three fast hardener will cure as low as 35F, but I ordered the medium hardener, as I probably will be doing most of this work when it is a bit warmer.

In the mean time, I'm starting to get the hull ready to accept the outer stem and stern posts and the keel. Where the planking meets the keelson I've left the overlaps rough. Before attaching the keel I'll have to smooth this out using the power plane. Over to the right you can see the view along the keelson. There are screw holes along the edge of the planking, those will have to be filled in with epoxy - which will also have to wait until the temperature warms up a bit.

Here you can see the view down from above the stern. Here also, the plank ends are uneven, and will need to be planed down to make a smooth surface for the outer stern post. The view at the stem is similar.

Keeping in mind what I've learned about using the power plane, I'm trying to take things nice and easy. I'm trying to go slowly, removing about 1/32 inch at each pass, and checking frequently with a level to make sure the surface is even. At first, I'm just taking off enough to make a level reference surface for the bed of the plane. After that, I'll go back and plane down until the width of the flat surface is equal to that of the keel. This will require a bit of thinking. As designed, the keel is 2.5" thick, with a bulge in the center section to accommodate a 4" wide lead ballast keel. I'll want to figure out just how I'll do this before I try to go too far. I'll need to see what kind of timber I can get for the keel before I can be sure how I'll get that done.

Where the centerline of the boat curves toward the stem and stern, the level becomes useless, and I use the face of the inner stem and stern posts as a guide. I've planed things down so the edges of the planks protrude just a millimeter or so in front of the inner posts. I don't want to plane past this reference surface until I must. Ideally, I wouldn't remove any of the stem and stern posts, just plane the planking down to it.

There is one area that is going to cause some problems. For some reason, which is lost to me now, I didn't recess the plank lands on the garboard at the stern. At the time, I filled in the gap with epoxy mixed with some sort of plastic filler, but making a fair surface for the keel to land on may be a bit of a challenge. Well, that's what makes life interesting, isn't it?

Until things warm up a bit, I'll have to look for ways to keep the project moving forward. I can make patterns for the outer stem and stern posts, lay out the pieces and glue them in the basement. I haven't decided whether these will be laminated, or sawn from glued up pieces, but I'm leaning toward the latter. That's what I did for the inner posts. I can also work on sanding the hull, in preparation for fairing and fiberglass. Most likely, it won't be too long before the temperature comes back up. In the meantime, well, it's ski season! Generally, the colder and snowier it gets, the happier I am.

Sunday, January 13, 2013

Cleaning Up the Seams, Continued

Well, several weeks have gone by, with more holidays and more guests. The rebate plane turned out to be a good idea, and made pretty quick work of what I had feared would be a long and painful task. The clearly articulated three step process for cleaning all the squeeze out from the seams was not, in the end, the best approach for most of the boat. As I worked along, I developed a slightly different approach: just do whatever seems to work best.

The epoxy that squeezed out had different consistencies, depending, I guess, on how much wood flour I mixed in, and how much it had cured before I got the plank into position. I ended up going back and forth between working toward the plank edge and working toward the face of the next plank. In places where the epoxy formed a convex "bead," everything went pretty smoothly which ever way I approached it. If the epoxy had settled into a "fillet," though, the plane would want to ride up out of the corner. Sometimes I would change directions back and forth, sometimes I would plane down to the wood in one direction, then turn and plane away the rest of the epoxy from the other. In the end, it went pretty quickly, and pretty successfully.

I did notice two things as I worked along. This was the first time I had really, carefully, looked over the whole hull since beginning this project so long ago. First, my level of craftsmanship has increased dramatically. The more recent planks have much cleaner edges than the earlier ones, which have some wavy lines. I was able to smooth some of the earlier ones while cleaning up the epoxy. Mostly, though, I figured these will be below the waterline and no one will ever see them anyway. I'll get to clean them up a little more when I round over the edges in preparation for putting a fiberglass skin on the hull.

Second, there are a few places where the seam is a little glue starved. I'll need to go back and use a syringe to fill some gaps. I still need to fill a ton of screw holes along the keelson. This will just add a little to that part of the project. The only area I'm concerned about is between the fifth and sixth plank near the starboard bow. There is a 2 to 3 foot stretch where I can see light between the planks. I need to figure out how to get a good bond between those planks. I'm thinking of taping the bottom of the seam and letting some unthickened run into it. Maybe use screws to pull the planks together while it cures. The gap is small - less than a millimeter, but with unthickened epoxy, I guess it's probably better to minimize the gap.