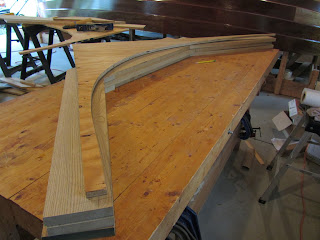
With the hull finished, at least for now, I turn my attention to the backbone structure: The outer stem post, the keel, and the outer stern post. The best way to proceed seems to be to begin at the front and work my way backward. I use some long skinny scraps, which I've been holding onto for a long time to mark the profile of the stem. The arrow heads are tacked to a strip of 1-by material with hot glue.
Then I transfer the marks to a sheet of plywood. The astute observer will notice that the plywood is more scrap leftover from the building moulds.
After tracing the tips of the arrows, and springing a batten through the marks, The stem template is cut out and tried in place. A little light shows through. After numerous rounds of sanding down high spots, the fit has improved - a bit, anyway. Still there are spots where light shows through, but nowhere is it more than a millimeter off. Good enough for now. I'll still have to shape the stem itself.
I'd been feeling a bit jealous of builders like Richard in Canberra, Alec in Bermagui, and Ron in Sydney who have exotic tropical hardwoods, like jarrah, growing in their neighborhood. I'd not heard of this wood before, but I sounds like the perfect wood for keel construction, especially in epoxy based construction, where white oak would be questionable. It occurred to me, though, that jarrah isn't exotic to these builders, and they might view certain North American hardwoods as exotic. Like sassafras.
When I first started building, one of the early decisions I had to make was what wood to use for the keelson and inner stem and stern post. More generally, I was in a quandary about what to use for the interior framing - deck beams, carlins, frames, and such. Ash is traditional, but not rot resistant. Iroko? A bit pricy. I even called Iain Oughtred himself, who was very friendly and answered all my questions. On the subject of what wood to use, though, he basically said, "whatever you can get." Then I was reading my copy of Steward, who has this to say about sassafras:
Weight about 2.4 pounds [per board foot] (light). Moderately hard, moderately weak in bending. Highly resistant to decay... Freshly cut boards are said to have a sassafras odor, if you know what that is like!
I do know what it's like. I've seen it described as "spicy" or "like root beer," but that doesn't quite get it. It's wonderful. And it fills the shop every time you cut or sand the wood. WoodenBoat, meanwhile, has this to say:
Highly durable; has properties like ash but not so tough; once popular in light skiff construction.
Well, that did it for me. It's not a major commercial wood by any stretch of the imagination, but if you ask at lumberyards and look around, you can find it here and there. A phone call and a drive to a sawmill about an hour away, and I had the sassafras lumber for the inner stem and stern and the keelson. Now, after years of planking with meranti plywood, it's back to sassafras. At the left, you can see the stock that will become the outer stem.
Here's the general setup.
I'll use the plywood template to trace the curve of the stem onto the assembly after it is all glued together.
And this is the big glue-up.
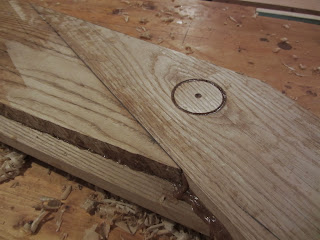
One thing about sassafras is that the trees do not grow especially large and it's difficult to find nice clear boards. There were a couple knots that I couldn't work around - well, didn't work around.
Before gluing everything together, I cut them out with a hole saw, and used the same saw to cut a plug from a clear section of another board.
When I noticed the knot on the back of the board (it didn't go all the way through, so I didn't notice when I laid out the cuts) I ought to have started over. I guess I was in "git 'er done" mode that night. I also could have tried to match the grain in the plug. Too late now. It's enshrined forever as a reminder to be more careful in the future. It may be below the waterline. If it's too glaringly obvious, I can always paint it, but probably not.

Gluing the nine boards together was a slippery. sticky mess. I typically work pretty pretty cleanly and carefully, but the bottom layer slid a little bit, leaving some gaps. I made the inner stem and stern this same way and, honestly, I can't remember a single thing about it. I remember gluing a copy of the full-size pattern on to cut out at the band saw, but nothing about the guue-up. I didn't have any trouble with misalignment of the boards, though. At least I don't think I did, they've been covered by the planking for a long time now. Did I drill holes through near the edges to stick a nail through while everything was clamped up? That would have been a really good idea. This is why you shouldn't take nine years off in the middle of your project. In case you wondered why more people don't to that. I filled these gaps with unthickened epoxy, which seeped right down in.
The next task is to trace the template onto the assembly...
...and then take it to the band saw. Not an easy cut to make all by myself, but by hook or by crook, I got the job done. More on that later.


